REDCap

REDCap(Research Electronic Data Capture) is a secure, web-based application designed to support data collection and management for research studies. It allows users to build and manage online surveys and databases quickly and without needing extensive programming knowledge.

REDCap is widely used in academic, clinical, and translational research for its flexibility, audit trails, data validation, and compliance with regulatory standards like HIPAA. Its features include automated workflows, user permissions, and integration capabilities, making it a powerful tool for capturing high-quality research data.

System Access

REDCap is accessible to all UM Faculty, Staff and Students. External users can also access REDCap with a CaneID which can be requested through the Cane Self-Service Portal. No additional request form is needed, access is automatically granted.

REDCap Login

Accordion Group

Open All Tabs

FAQ

Open All Tabs
  • How do I access REDCap?

    Anyone who needs access to REDCap must have an active CaneID, including UMiami personnel and external collaborators. Please visit CaneID to register or for additional assistance with your account. Once a CaneID is obtained, navigate to https://redcap.miami.edu, log in using your CaneID credentials and complete the presented form. Once confirmed, your account will be created immediately.

    register for a CaneID please visit: 
    https://idm.miami.edu/caneid/registration?execution=e1s1.

    Once a CaneID is obtained, to access REDCap, please navigate to https://redcap.miami.edu, log in using your CaneID credentials, then complete and submit the presented form below. A REDCap account will be provisioned immediately.

  • Which studies can be included in REDCap?

    Although the University of Miami’s REDCap application is a web-based, secure, and HIPAA compliant system, there are three categories of studies that are not REDCap eligible:

    🚫 Research that requires 21 CFR Part 11 compliance

    🚫 Research that involves an investigational new drug or device

    🚫 Research that is tracked for billing compliance

    If your project falls into any of the above, then Velos eResearch is the application you should use. Please see the Clinical Research Participant Enrollment and Tracking Policy (PDF) for more information.

    If your Research does not require 21 CFR Part 11 compliance or involve an investigational new drug or device, but requires tracking for billing compliance, you may still use REDCap as a supplemental system to Velos as long as all participants are registered in Velos for billing compliance purposes.

  • Where can I find REDCap tutorials?

    REDCap has a few quick video tutorials available that will provide more details on the application. To view them, click on the “Training Videos” link near the top of the page, after logging into REDCap. If you don’t see the link, navigate to here after logging in: https://redcap.miami.edu/index.php?action=training

    As of 2024, the REDCap project is 15 years old and used by over 7000 institutions. There are many free and accessible resources online. Additionally, University of Miami hosts several trainings offered by the Biostatistics Collaboration and Consulting Core (BCCC) and the Biomedical Data Services at the Louis Calder Memorial Library. 

    Biomedical Data Services: https://sp.library.miami.edu/subjects/biomedicaldata#tab-8

    BCCC: https://www.publichealth.med.miami.edu/divisions/biostatistics/biostatistics-core/index.html

    Training videos from the University of Arizona: https://cb2.uahs.arizona.edu/services-tools/surveys-clinical-databases-redcap/redcap-video-tutorials

  • How to gain access to an existing project

    To gain access to a project, please contact your project administrator/PI so that they can add you to the project.  If you are the administrator seeking access and your project is not an e-Consent project associated to a research study with FDA oversight, please complete the REDCap Form - User Right here.

    REDCap Form - User Rights

  • How to request Administrative rights to a project and when is it permitted?

    Team members with a project administrative role have the ability to manage all aspects of a project including the addition and removal of team members.  The only exception where Administrative rights are not permitted is for e-Consent projects associated to research studies with FDA oversight.  The administration of the study team members for these projects is managed by the REDCap Administrator.

    To request Administrative rights for non-FDA e-Consent projects or to request team members to be added or removed for FDA e-Consent projects, please submit the User Matrix ServiceNow Form.  

    REDCap Form - User Rights

  • How to request a new project:

    New project requests are initiated within the REDCap application by following the steps below:

    1. Log into REDCap at REDCap.miami.edu

    2. Click on the + New Project link (near the top of the site) for each project that you would like to request.

    3. Complete the form and when you click on the blue “Create Project” button, the Decision Tree Survey will display in a pop up window to complete additional information regarding your project.

    4. Complete the Decision Tree Survey and when you click Submit, a system generated email will be sent to the ServiceNow ticketing system, which will auto create a ServiceNow ticket for the fulfillment of your project request. All communications for your project request from the REDCap administrator will be performed via the auto generated ServiceNow ticket. You will receive an email with the ticket.

  • When am I required to complete a Decision Tree Survey (DTS)?

    The Decision Treey Survey (DTS) is required for all projects.  The DTS determines the eligibility of your project to be implemented in REDCap. This is a required step for your project to be eligible for REDCap, and all questions must be answered.  Upon completing and submitting the DTS, an email is sent to the ServiceNow ticketing system and you will receive an autogenerated new project ticket for your submission.  All communications regarding your project request will be via this ticket until fulfillment of you request is complete.

  • How to add, modify or delete a variable on an instrument?

    1. Navigate to My Projects to locate your project.
    2. Click the “Designer” link under the “Project Home and Setup” section.
    3. Click on the name of the instrument that you wish to modify.
    4. While in the instrument, follow the respective steps for the desired action


    To add a variable:

    Click on the "Add Field" button, just above or below the area/section that you'd like to insert the new variable/field:


    To modify a variable:

    Click on the pencil icon for the field you wish to modify.

    Edit within the "Edit Field" pop up window

    Click on the Save button on the bottom right to commit the changes.


    To delete a variable:

    Click on the red "X" corresponding to the item that you wish to remove:

    Click on the Delete button on the "Delete Field" button of the pop-up window to confirm.

  • How to create alerts and notifications for your project?

    Navigate to My Projects to locate your project in REDCap.

    Click on the “Alerts & Notifications” link under the Applications section on the left.

    Click on the green "Add New Alert" button on the right

    Complete the Create New Aler form and click on the green “Save” button at the bottom to save / add the new alert.

  • How to add and remove team members on a project?

    You must have Administrator rights to alter privileges for other users, i.e. edit team members on projects. As best practice, this access is usually granted via the role of PI or system administrator. There are exceptions to granting Administrator rights to a project.

    As best practice, this access is usually granted via the role of PI or system administrator. There are exceptions to granting Administrator rights to a project.  For more information on this please click here.  To request Administrator rights you must complete and Submit the User Matrix ServiceNow form found here.

    Adding A Team Member:

    1. Navigate to your project in REDCap.
    2. Click on the "User Rights" link under the applications section on the left.
      1. REDCap adding a user prefrence pane
    3. The User Rights module will be shown on the right.
      1. REDCap adding a user second preference pane
    4. Enter the C number of the person that you wish to add in the "Assign new user" text box.
    5. After entering the C number, lick on the "Assign to role" button, select the role from the "-select role --" drop down list.
    6. Confirm the C number being added, the role to be assigned, then click on the Assign button.
    7. An alert will be shown confirming that the C number has been added to the project.

    Removing a Team Member

    1. While in the User Rights module, click on the team member's name.
    2. Click on Edit user privileges.
    3. Click the Remove user button on te bottom right hand of the Editing existing user window.


  • When and how to move a project to production

    When to move a project to production: All REDCap projects begin in Development mode. After the project is developed and tested thoroughly, the project must be moved to Production mode before collecting "real" data. Prior to moving a project to Production, it is recommended that testing is completed by simulating data collection. Changes to a project in Production should be kept to a minimum or ideally to none. Once a project is moved to Production, changes to the project may cause accidental deletion of collected data; therefore, changes must be reviewed and committed by the REDCap Administration team, which may take several business days. See “Can I make changes to a project after moved to production?” for more information.

    Moving a Project to Production:

    1. Navigate to My Projects to locate your project in REDCap
    2. Click on the "Project Setup" link under the "Project Home and Design" section on the left.
      1. REDCap moving a project
    3. Scroll to the "Move your project to production status" on the right (near the bottom of the page)
    4. Click on "Move project to production" button
    5. Select whether you would like to keep or delete all of your data.
    6. Click on the 'YES, Move to Production Status"
      1. REDCap confirm move project

    An email will be sent to the REDCap Administrative team who will work on your request to move your project to production or advise if anything further is needed.


  • Can I make changes to a project after moved to production?

    Yes, a project can be moved back to development status to make the necessary changes such as revision to existing project instruments, addition of new instruments.  To move a project from Production to Development, please contact the REDCap Administrative Team so that they can further assist.

    When making changes in production, REDCap offers built-in checks to safeguard against unintentional data loss caused by, for example, deleting a field, changing a field type, altering a multiple-choice option, rewording a field prompt.  To make changes while in production, the project must be entered into draft mode, and the changes submitted for review when completed. There are some changes that will need to be reviewed and committed by the REDCap Administrator team. This is done to ensure your data is not adversely affected by the changes you are making.


    Enter Draft Mode:

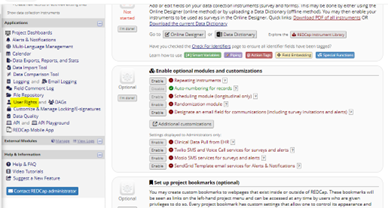
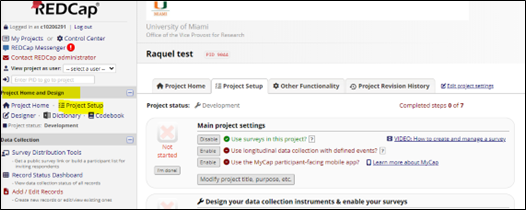
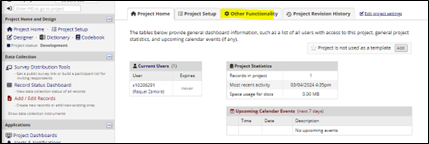
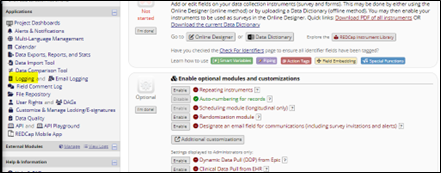
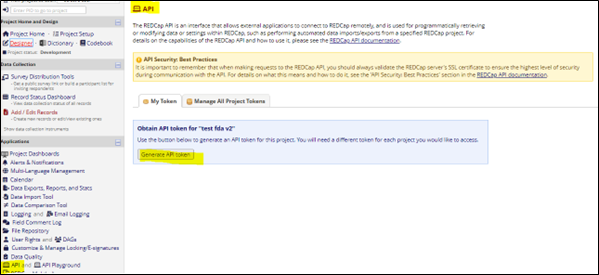
    1. When in the project, navigate to the Designer link and click the Online Designer tab. 
    2. Click on the Enter Draft Mode button.
      1. REDCap changing a project
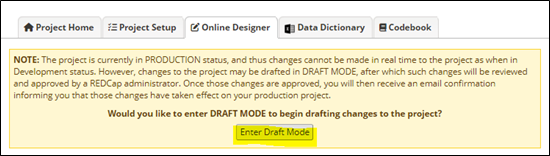
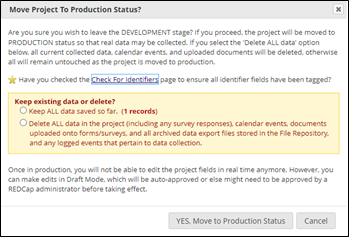
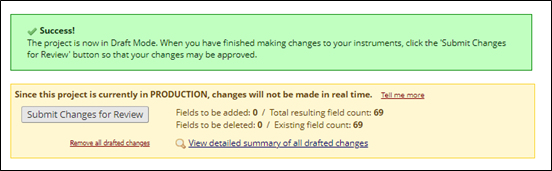
    3. The following message will appear:
      1. REDcap change a project pane

    Process After Change

    After making the changes, it is highly recommended to click on the “View detailed summary of all drafted changes”, screenshot below, link which displays a preview of all the fields that are added, removed, and modified, and drawing attention to changes that could result in data corruption or deletion.  Any changes in RED should be carefully reviewed.

    REDCap confirm change of project

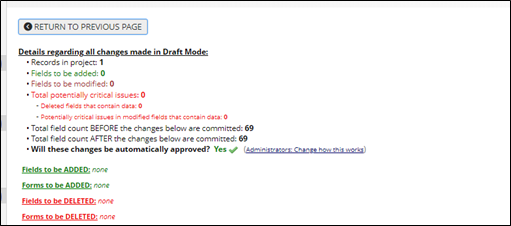
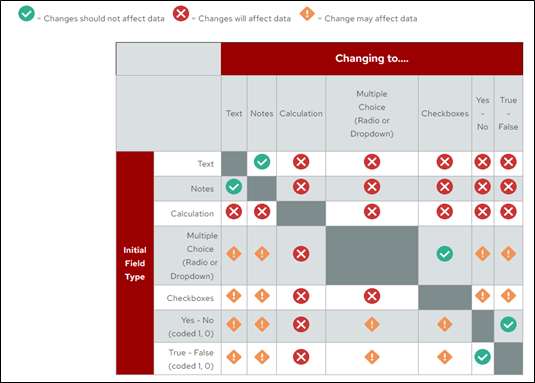
    This table summarizes types of changes and possible impact.  The changes that need to be carefully made and considered are to those fields where data already has been collected.

    REDcap change a project table

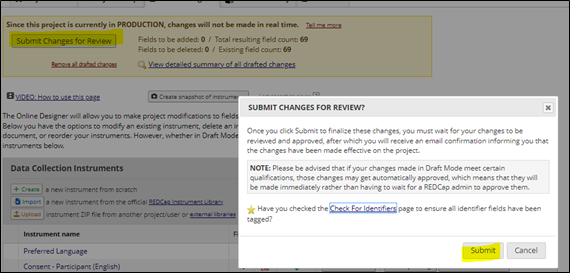
    When ready to submit changes, click the Submit Changes for Review button and then click Submit.  As stated, there are changes that will need to be reviewed and committed by the REDCap Administration team to prevent undesirable changes or loss of data. 

    REDCap confirm project change

    Tips and recommendations for the following project changes:


    • Changing labels - If your field contains data, you may want to instead create an entirely new field to capture the new data and then use the @HIDDEN action tag to hide the field you will no longer be using. This allows the field and data to remain in your project for reports & exports, but you will no longer see it on data entry pages.
    • Deleting fields - If your field does not contain data, deleting the field can be acceptable. If your field contains data, you may want to instead use the @HIDDEN action tag to hide the field you will no longer be using. This allows the field and data to remain in your project for reports & exports, but you will no longer see it on data entry pages.
      • To 'undo' the field deletion, you will need to re-create that field. Your project codebook (found under the Project Home and Design section) will list all fields in your project - including the one you had planned to delete. You can re-enter a new field and use the same variable name you previously had. 
      • The other option is to use the 'Remove all drafted changes' link found in the online designer - draft mode area (yellow section). This will remove ALL planned changes. There is no way to accept some changes, but not others.

  • How to copy a project

    To initiate a copy request, please follow the steps below:

    1. Navigate to My Projects to locate the project you wish to have copied.
    2. Click on the “Project Setup” link under the “Project Home and Design” section on the left.
    3. Click on the “Other Functionality” tab on the right.
      1. REDCap copy a project
    4. Click on the green “Copy the project” button under the “Copy or Back Up the Project” section.
      1. REDCap Confirm copy project
    5. Enter the new project title in the corresponding text box, select the project purpose, select the options that you wish to have copied, click on the “Copy project” button.
      1. REDCap confirm copy
    6. Once the above steps have been completed, a request will be sent to our team, and if needed, our team will send a decision tree survey for you to submit.

      After this has been received, we will then be able to move forward with your request.

  • How to delete a project

    1. Navigate to My Projects to locate your project to be deleted.
    2. Click on the “Project Setup” link under the “Project Home and Design” section on the left.
    3. Click on the “Other Functionality” tab on the right.
      1. REDCap Delete Project
    4. Click on the (red) “Delete the project” button under the “Data Management” section (on the right)
      1. Redcap delete project
    5. Type “DELETE” in the red textbox and click on the “Delete the project” button to permanently delete the project.
      1. Redcap delete project
    6. Confirm your decision by clicking on the “Yes, delete the project” button.
    7. Click on the Close button.
    8. Your project will be deleted, and you will be redirected to your “My Projects” page.

  • How to copy or delete an instrument within a project

    1. Navigate to My Projects to locate your project that you wish to have copied.
    2. Click on the Designer link under the “Project Home and Design” section on the left.
    3. Click on the “Choose Action” button on the right, corresponding to the instrument that you wish to delete or copy.
    4. Select the "Delete" or “Copy” option.
      1. redcap copy instrument
    5. Depending on the action selected you will be asked to confirm whether you would like to copy or delete the instrument.
    6. Your list of instruments will update, with the deleted or copied instrument.

  • How to create an XML File

    1. Navigate to My Projects to locate your project in REDCap. 
    2. Click on the “Project Home” link under the “Project Home and Design” section on the left. 
    3. Click on the “Other Functionality” tab on the right. 
    4. Click on the “Download metadata only (XML): button: 
      1. redcap create xml

  • Instructions to backup project and data (highly recommended before making changes to data fields on live project)

    1. Navigate to My Projects to locate your project.
    2. Click on the “Project Setup” link under the “Project Home and Design” section on the left.
    3. Click on the “Other Functionality” tab on the right. 
    4. Scroll to the “Copy or Back Up the Project” section (on the right) 
    5. Click on the “Download metadata only (XML)” or “Download metadata & data (XML)” button after selecting your options for user roles, surveys and survey settings, and survey queue. 
      1. The “Download metadata only (XML)” option will create a backup of the project structure only. 
      2. The “Download metadata & data (XML)” option will create a backup of the project and data. 
      3. redcap backup project

    Another way to backup your project’s data is by navigating to the “Data Exports, Reports, and Stats” link under the Applications section on the left, click Export Data, and select the desired data format option to export.

    Redcap back project pane

    Redcap back project pane

    Redcap back project pane

  • How to change the project details (i.e. title, purpose etc.)

    1. Navigate to My Projects to locate your project.
    2. Click on the “Project Home” link under the “Project Home and Design” section on the left.
    3. Click on the “Project Setup” tab on the right.
    4. Click on the “Modify project title, purpose, etc.” button under the “Main project settings” section.
      1. redcap update project
    5. Update the project details.
      1. Redcap project update
    6. Click on the Save button to commit your changes.


  • Where to access the REDCap e-consent trainings

    1. Visit the Moodle website by going to https://www.e-gcrme.com/ctsi/
    2. If this is your first-time visiting Moodle, you will have to create a Moodle account by clicking the Create New Account button:
      1. redcap econsent
    3. When you log into Moodle, click on Course Search and type REDCap:
      1. Redcap econsent training
      2. Redcap econsent training
    4. Moodle will return all the REDCap related courses. The e-Consent courses will display for you to select from.  The University provides two versions of REDCap.  One version is for research that is not FDA regulated.  The other version is compliant with 21 CFR Part 11, for FDA-regulated research.  It is important to use the FDA version for all research involving investigational drugs, biologics, vaccines and medical devices.  
      1. econsent training modules
    5. Please Note: The “21 CFR Part 11: REDCap e-consent” is mandatory if you plan to use REDCap as the e-Consent tool to consent study participants for a research study that has FDA oversight. If the study does not have FDA oversight, the other course is optional, but highly recommended to help you understand the e-consent workflow and process.  For information on remote e-consenting please refer to the Investigator Manual.

  • How to create a consent project

    1. Navigate to REDCap (redcap.miami.edu)
    2. Click on the “+ New Project” link at the top of the screen or navigate to https://redcap.miami.edu/index.php?action=create#/
    3. Enter the project title and purpose.
    4. For the “Start project from scratch or begin with a template?” question, select “Use a template (choose one below) option:
      1. redcap econsent create
    5. Select the “21 CFR Part 11 eConsent Template” or the “CTSI – eConsent Template” from the project templates:
      1. econsent create econsent
    6. Click on the “Create Project” button.
    7. An email will be sent to our team with the request, and if needed, our team will send a decision tree survey to you/the requestor to complete.
    8. Upon completion of the decision tree survey, the project with the template will then be completed.
    9. REMINDER: If the “21 CFR Part 11 eConsent Template” is used, all study team members on the research study must take the mandatory eConsent training video.

  • How to view the activity log for a project

    1. Navigate to My Projects to locate your project.
    2. Click on the Logging link under the Applications section on the left.
      1. redcap view activity log
    3. The project logs will show on the right.
    4. Click on the drop-down arrow for the “Filter by event” option, and select “Record created-updated-deleted” (or whatever filter you prefer)
      1. redcap view activity
    5. The page will refresh and show the applicable events for the filter selected.

  • How to enable modules for your projects

    1. External modules are used to customize and enhance the functionality of your REDCap project.  Follow the steps below to view the available External Modules:
    2. Navigate to My Projects to locate your project.
    3. Click on the “External Modules” under the Applications section on the left and click on the green “Enable a module” button on the right:
      1. redcap enable module
    4. On the popup window that appears, search for the module that you would like and click on the “Enable” button for the respective module:
      1. redcap enable module

  • How to generate an API Token

    1. Navigate to your project in REDCap.
    2. Click on the API link under the Applications section on the left.
    3. Click on the “Generate API token” button in the blue section on the right.
      1. redcap generate api

  • How to schedule a consultation with a REDCap Administration team?

    Please submit a ticket to help@med.miami.edu, and be sure to include the word “REDCap” as part of the email Subject line.  When the email is sent, a ServiceNow ticket will auto generate and will get triaged to a REDCap system administrator.

    Examples of consultation, but not limited to are the following:

    • How to I import data from an external system into REDCap
    • Assistance with complex edits to projects
    • Deletion of project data and how to recover
    • Should I use REDCap for a given business or research use case?
    • How to use REDCap’s API?
    • How can I get my project to integrate with EPIC data?
    • How do I get access to use Twilio/Mozio?
    • What is the process to use REDCap Mobile App?
    • Use of MyCap Mobile?

Support

Our Research Support Helpdesk is here to help: 

Monday - Friday
8:00 AM - 5:00 PM
305-243-2314
Submit Request

Top